Skip to content
Iristrace Helpdesk
  • First steps
  • Checklists
  • Templates
  • Workflows
  • Users
  • Departments
  • Reports
  • Notifications
  • Data download
  • Dashboard
  • Recommendations for use
  • Integrations & BI
  • Glossary
Popular Search como

First steps

  • Add Additional Company Contact Fields
  • Accessing Iristrace’s web/desktop platform
  • Accessing Iristrace on mobile
  • Customizing Iristrace with your corporate image or logo
  • Customize your Iristrace environment
  • Changing the language of your account in Iristrace
  • Iristrace Menu Interface
  • Creating and answering a checklist in the web version of Iristrace

Checklists

  • How to View Checklists in the Kanban View
  • Creating and answering a checklist in the web version of Iristrace
  • How to answer a checklist from the Iristrace mobile app
  • How to create and answer a checklist from the web version of Iristrace
  • What additional options are available to the user when answering a checklist?
  • How to answer a checklist without connectivity (offline mode)
  • How to browse checklists in web version
  • How to filter the list of checklists in the web version
  • How to create an action plan in a checklist
  • How to set up a dynamic title per checklist
  • How to mass import checklists into Iristrace
  • How to manage incidents recorded in Iristrace
  • How to download an Excel file of incidents
  • Create and download checklist reports
  • How to assign a checklist to a user
  • How to change the department of a checklists

Templates

  • How to configure the visibility of a category of questions in a checklist based on its status
  • Archive Templates
  • How to create templates in Iristrace
  • What types of questions can be configured
  • What additional options can be configured in questions Excerpt
  • How to create default responses and reuse response structures
  • How to configure default responses
  • How to create statuses and status groups
  • How to create templates for action plans
  • How to examine the metadata in your templates
  • What are the additional functionalities of the templates?
  • How to customize a template
  • How to set basic scoring in templates
  • How to set up conditional questions
  • How to set up an advanced scorecard
  • How to Create a Random Question Template
  • How to set score thresholds for multiple choice questions

Workflows

  • How to create a Workflow to send notifications by email
  • How to create a Workflow to create checklists

Users

  • Checklist Access Control: Restrict Checklist Visibility by User and Template
  • “View Users” Permission
  • How to create a user
  • Managing Custom Permissions
  • How to mass customize user permissions

Departments

  • How to create a department
  • What are departments in Iristrace
  • How to create subdivisions
  • How to assign users to departments
  • How to customize the title “Departments”.

Reports

  • Exporting a report in Word format
  • How to customize PDF reports

Notifications

  • Creating a Notification Based on an Automatic Event
  • How to Generate a Notification According to a Time Periodicity
  • How to set up an automatic instant message (notifications)
  • How to download the requested reports

Data download

  • How to download an Excel file of incidents

Dashboard

  • How to create a dashboard

Recommendations for use

  • How to solve the most common web application stability issues
  • How to solve the most common problems with Iristrace access
  • How to resolve text mismatches in the calendar

Integrations & BI

  • Intermediate Database Iristrace
  • Data model
  • Connecting MariaDB with Microsoft Power BI
  • Conectar MariaDB con JDBC
  • ODBC data source
  • Connecting MariaDB with Google Looker Studio
  • Direct connection to MySQL Workbench
  • Connecting MariaDB to SAP Datasphere
  • Connection between MariaDB and Tableau
  • Connecting from Azure Synapse via local connection
View Categories
  • Home
  • Iristrace Help Desk
  • Templates
  • How to create statuses and status groups

How to create statuses and status groups

Learn how to configure the different states your checklists can go through in Iristrace to fit your business processes.

A status shows the current status of a checklist.

Whereas a group of states represents the different phases that a checklist goes through until it is completed.

1. How to configure the statuses #

1.1. Enter the Administrator user menu #

To be able to create statuses you have to be in the “Administrator User”.

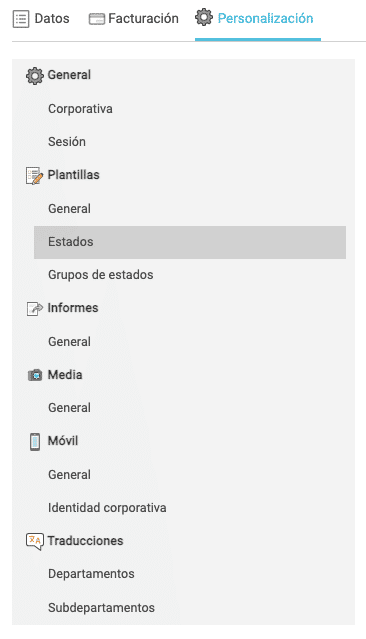
1.2. Go to the “Personalization” tab. #

Then you have to select the “Customization” tab to see the different configuration and customization sections that you can do to your account.

Within the “Templates” section you have to select “States”.

1.3. Click the “Add status” button #

In case you want to add a new status click on the “Add status” button.

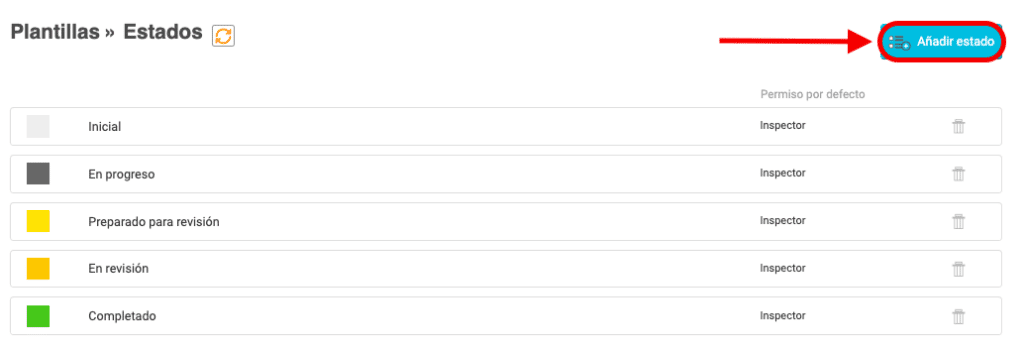
If you want to access the configuration of one of the created states, simply click on its registry to access its information.

1.4. Add a new status #

You can see that there is a record of default statuses by the Iristrace tool, but you can create more by clicking on “Add Status”.

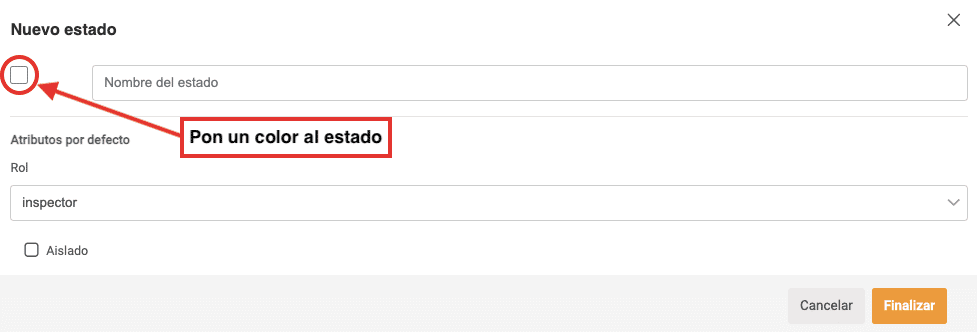
To create a new status you have to enter the following information:

  • Name the state.
  • Color (optional).
  • A role, so that users who match the role’s status role will be shown in the permission settings.
  • And finally, if necessary, specify that this state is “Isolated” from the rest. Where it would not follow the selected status group, but would go separately, i.e. you could jump to this “Isolated” status without having to go through the rest.

To finish creating the status, click on “Finish”.

2. How to configure status groups #

Once you have defined the statuses you are going to use, you can start creating the status group.

2.1. Go to the “Status Groups” option in the “Templates” category. #

In the same “Customization” section of the admin user menu, select the “Status Groups” option.

LACK OF IMAGE

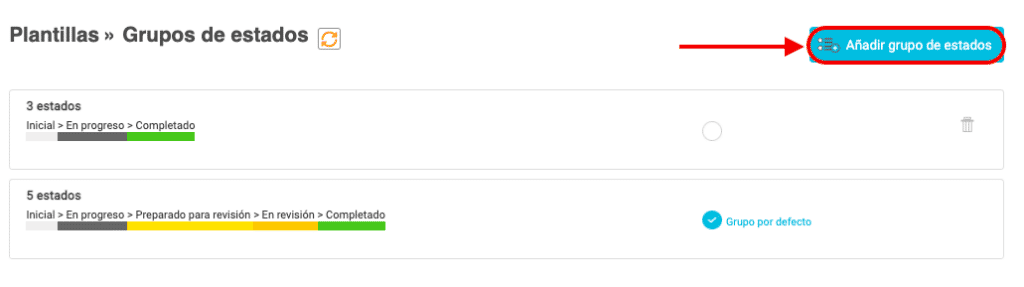
2.2. Click the button “Add status group”. #

To create a new status group you have to click on “Add status group”.

To create a new status group you must enter a series of information as follows:

  • First you have to assign a name to the whole group.
  • Select the states you want to group.
  • Arrange the states in the order you prefer by dragging them with the arrow cross on the left to place them above or below another state.
  • You have the option to specify that it is an automatic state by clicking on its square. For example, if “Initial” is an automatic status, when the checklist is started and the status is changed directly to “Ready for Review”, it will not go through “Initial”.
  • If the status was not determined to be “Isolated” when the status group was created, you can check to specify that the group is “Isolated”.

In every instance of Iristrace there are two groups of predefined states, which can be modified by entering each of them.

In any case, you can customize the status groups according to your needs.

3. How to apply a status group to a template #

The creation of state groups is done in order to be applied to a template. To do this you can modify the status group of one that is already created or implement it when creating a new template.

3.1. Go to the “Data” tab of the template #

In the “Templates” section, you have to enter the template you want to modify.

3.2. Select the status group #

Once inside, in the “Data” tab, you will see a section on the screen that says “Status Group”. You have to open the dropdown and the status groups that were created will appear, and you can select the one you need.

Once changed, click on “Save”.

Was this helpful ?
Do you still need help?

How can we help?

Updated on July 24, 2024
How to configure default responsesHow to create templates for action plans

Powered by BetterDocs

Table of Contents
  • 1. How to configure the statuses
    • 1.1. Enter the Administrator user menu
    • 1.2. Go to the "Personalization" tab.
    • 1.3. Click the "Add status" button
    • 1.4. Add a new status
  • 2. How to configure status groups
    • 2.1. Go to the "Status Groups" option in the "Templates" category.
    • 2.2. Click the button "Add status group".
  • 3. How to apply a status group to a template
    • 3.1. Go to the "Data" tab of the template
    • 3.2. Select the status group
  • English
    • EspaƱol
    • Deutsch
  • English
  • Spanish
  • German