Skip to content
Iristrace Helpdesk
  • First steps
  • Checklists
  • Templates
  • Workflows
  • Users
  • Departments
  • Reports
  • Notifications
  • Data download
  • Dashboard
  • Recommendations for use
  • Integrations & BI
  • Glossary
Popular Search como

First steps

  • Add Additional Company Contact Fields
  • Accessing Iristrace’s web/desktop platform
  • Accessing Iristrace on mobile
  • Customizing Iristrace with your corporate image or logo
  • Customize your Iristrace environment
  • Changing the language of your account in Iristrace
  • Iristrace Menu Interface
  • Creating and answering a checklist in the web version of Iristrace

Checklists

  • How to View Checklists in the Kanban View
  • Creating and answering a checklist in the web version of Iristrace
  • How to answer a checklist from the Iristrace mobile app
  • How to create and answer a checklist from the web version of Iristrace
  • What additional options are available to the user when answering a checklist?
  • How to answer a checklist without connectivity (offline mode)
  • How to browse checklists in web version
  • How to filter the list of checklists in the web version
  • How to create an action plan in a checklist
  • How to set up a dynamic title per checklist
  • How to mass import checklists into Iristrace
  • How to manage incidents recorded in Iristrace
  • How to download an Excel file of incidents
  • Create and download checklist reports
  • How to assign a checklist to a user
  • How to change the department of a checklists

Templates

  • How to configure the visibility of a category of questions in a checklist based on its status
  • Archive Templates
  • How to create templates in Iristrace
  • What types of questions can be configured
  • What additional options can be configured in questions Excerpt
  • How to create default responses and reuse response structures
  • How to configure default responses
  • How to create statuses and status groups
  • How to create templates for action plans
  • How to examine the metadata in your templates
  • What are the additional functionalities of the templates?
  • How to customize a template
  • How to set basic scoring in templates
  • How to set up conditional questions
  • How to set up an advanced scorecard
  • How to Create a Random Question Template
  • How to set score thresholds for multiple choice questions

Workflows

  • How to create a Workflow to send notifications by email
  • How to create a Workflow to create checklists

Users

  • Checklist Access Control: Restrict Checklist Visibility by User and Template
  • “View Users” Permission
  • How to create a user
  • Managing Custom Permissions
  • How to mass customize user permissions

Departments

  • How to create a department
  • What are departments in Iristrace
  • How to create subdivisions
  • How to assign users to departments
  • How to customize the title “Departments”.

Reports

  • Exporting a report in Word format
  • How to customize PDF reports

Notifications

  • Creating a Notification Based on an Automatic Event
  • How to Generate a Notification According to a Time Periodicity
  • How to set up an automatic instant message (notifications)
  • How to download the requested reports

Data download

  • How to download an Excel file of incidents

Dashboard

  • How to create a dashboard

Recommendations for use

  • How to solve the most common web application stability issues
  • How to solve the most common problems with Iristrace access
  • How to resolve text mismatches in the calendar

Integrations & BI

  • Intermediate Database Iristrace
  • Data model
  • Connecting MariaDB with Microsoft Power BI
  • Conectar MariaDB con JDBC
  • ODBC data source
  • Connecting MariaDB with Google Looker Studio
  • Direct connection to MySQL Workbench
  • Connecting MariaDB to SAP Datasphere
  • Connection between MariaDB and Tableau
  • Connecting from Azure Synapse via local connection
View Categories
  • Home
  • Iristrace Help Desk
  • Notifications
  • How to set up an automatic instant message (notifications)

How to set up an automatic instant message (notifications)

Set up instant messages to communicate specific actions to your users in an automatic and controlled way.

On the Notifications tab in Iristrace, you can configure your notifications in email or push format to inform all your users about what is happening with the checklist items.

Create a notification in the Notifications panel. #

If you have the appropriate permissions, you can set up notifications for your users in the Notifications section of the Settings tab.

Once you click on the “Create” button, the different options to generate your notifications appear.

There are different types of notifications you can generate to communicate to your users.

  • Instant Message
  • Automatic events
  • Automatic message

In this section you will learn how to create an instant message.

You can check out the links to the other types of notifications to learn how to set them up.

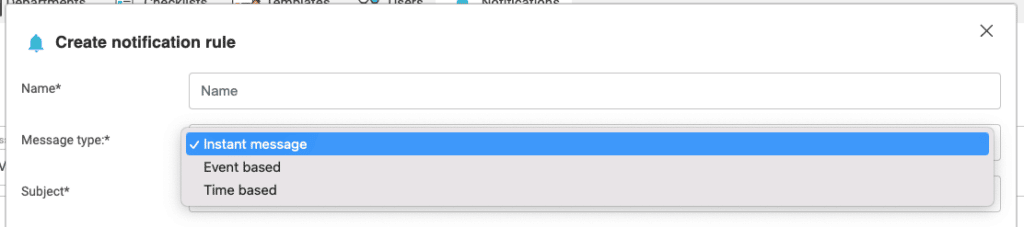
2. Select the option “Instant Message”. #

In the “Message Type” selector choose the “Instant Message” option.

3. Complete the initial fields #

There are several fields that you will initially need to fill in to set up the notification.
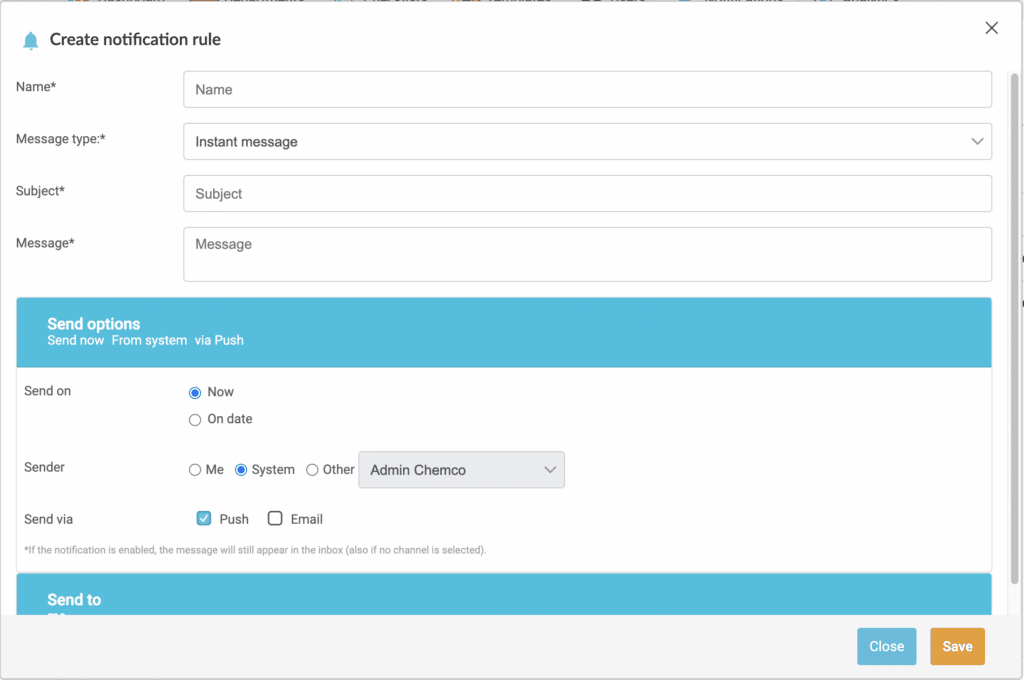
3.1. Title #

Text with which you want to register the notification and which will appear in the list of notifications to identify it.

3.2. Subject #

Subject that will appear in the notification that the recipient user will receive.

3.3. Message #

Text of the message body that will contain the notification.

3.4. Date of shipment #

Date you want to send the message.

You have two options:

  • Now
  • Scheduled Date

3.5. Submitted by #

User who is the sender of the message and who will appear as the sender of the sent message.

3.6. Send by #

Select the type of notification you want to issue:

  • Push
  • Email

(*) A push notification is always received within the Iristrace application.

Was this helpful ?
Do you still need help?

How can we help?

Updated on November 16, 2022

Powered by BetterDocs

Table of Contents
  • Create a notification in the Notifications panel.
  • 2. Select the option "Instant Message".
  • 3. Complete the initial fields
    • 3.1. Title
    • 3.2. Subject
    • 3.3. Message
    • 3.4. Date of shipment
    • 3.5. Submitted by
    • 3.6. Send by
  • English
    • EspaƱol
    • Deutsch
  • English
  • Spanish
  • German