The Announcements feature lets you broadcast important messages, updates, and media directly to users on the Iristrace mobile app. Post creators can target specific departments or individual users, attach images and documents, and track responses through a built-in reactions system. Posts appear in a dedicated timeline on the mobile home screen, making them easy to find and hard to miss.
This guide covers how to configure the feature as an administrator and how to use it as a mobile app user.
Table of Contents #
- Administrator Setup
- Accessing Announcements
- Creating a Post
- The Announcements Timeline
- Viewing a Post in Detail
- Reactions
- Reminders
- Managing Posts
Administrator Setup #
Before users can create or receive posts on the mobile app, an administrator must enable the feature and designate which users are allowed to create posts.
Enabling the Announcements Feature #
- In the web admin, click your profile icon to open the admin panel.
- Navigate to Mobile → General.
- Check the Enable Announcements feature toggle.
Once enabled, the Announcements section will appear on the home screen of the mobile app for all users in your organization. All users can view and react to posts — no additional configuration is needed for recipients.
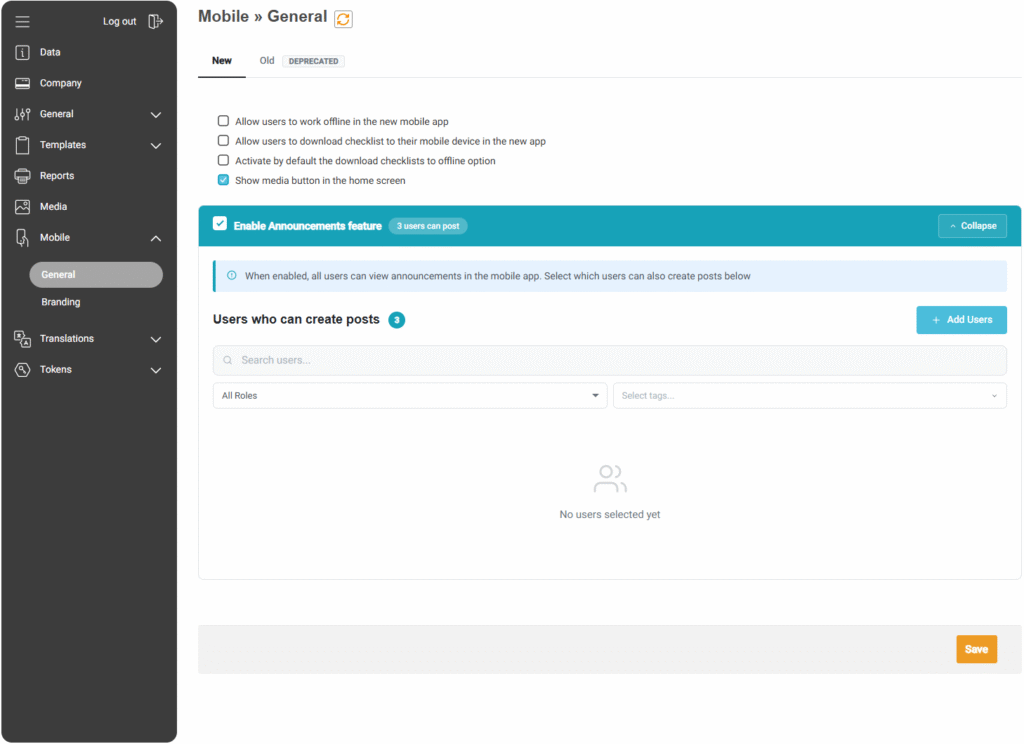
Designating Post Creators #
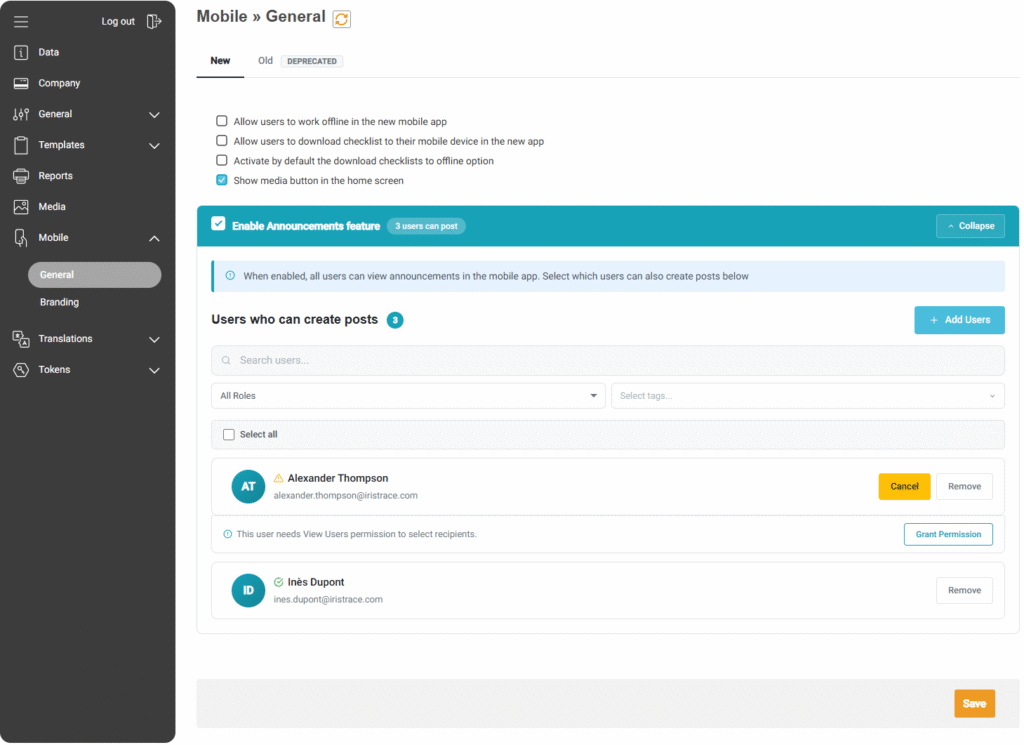
By default, only administrators can create posts. If you want other users to be able to create posts, you must add them to the “Users who can create posts” list, which appears directly below the enable toggle.
- Click + Add Users.
- Search for the user by name or email. You can filter by Role or Tags to narrow the list.
- Select the user(s) you want to grant post creation rights to.
- Click Save.
The list displays a counter (e.g., “1 users can post”) and shows all designated post creators with their name and email.
View Users Permission Requirement #
Post creators must have the View Users permission in order to select recipients and track reactions. If you add a user to the create posts list who does not yet have this permission, a warning will appear:
“This user needs View Users permission to select recipients.”
You can click Grant Permission directly from this screen to resolve it, or click Cancel / Remove if you want to handle it differently.
Who Can a Post Creator Target? #
A post creator can only target users who share at least one department with them. For example, if Guillaume belongs to Department 1 and Department 2, he can target any user who is also assigned to Department 1, Department 2, or both. He cannot target Erik if Erik only belongs to Department 3.
Administrators are the exception — they have full visibility and can target any user across all departments.
Note: Administrators automatically have full access to all posts, including the ability to view, manage, delete, and send reminders for any post, regardless of whether they are a recipient or the post creator.
Accessing Announcements #
The Announcements section is accessible directly from the mobile app home screen.
- On the Home screen, look for the Announcements row at the top. It displays the number of posts that require your attention (e.g., “6 posts require attention”).
- Tap the Announcements row or the arrow to open the timeline.
The counter on the home screen reflects the number of posts that are either new and unread, or still require a reaction from you. Once you have fulfilled the required reactions on a post, the counter decreases accordingly.
Creating a Post #
Users with post creation rights can compose new posts from within the Announcements timeline.
- Open the Announcements timeline from the home screen.
- Tap the + Post button.
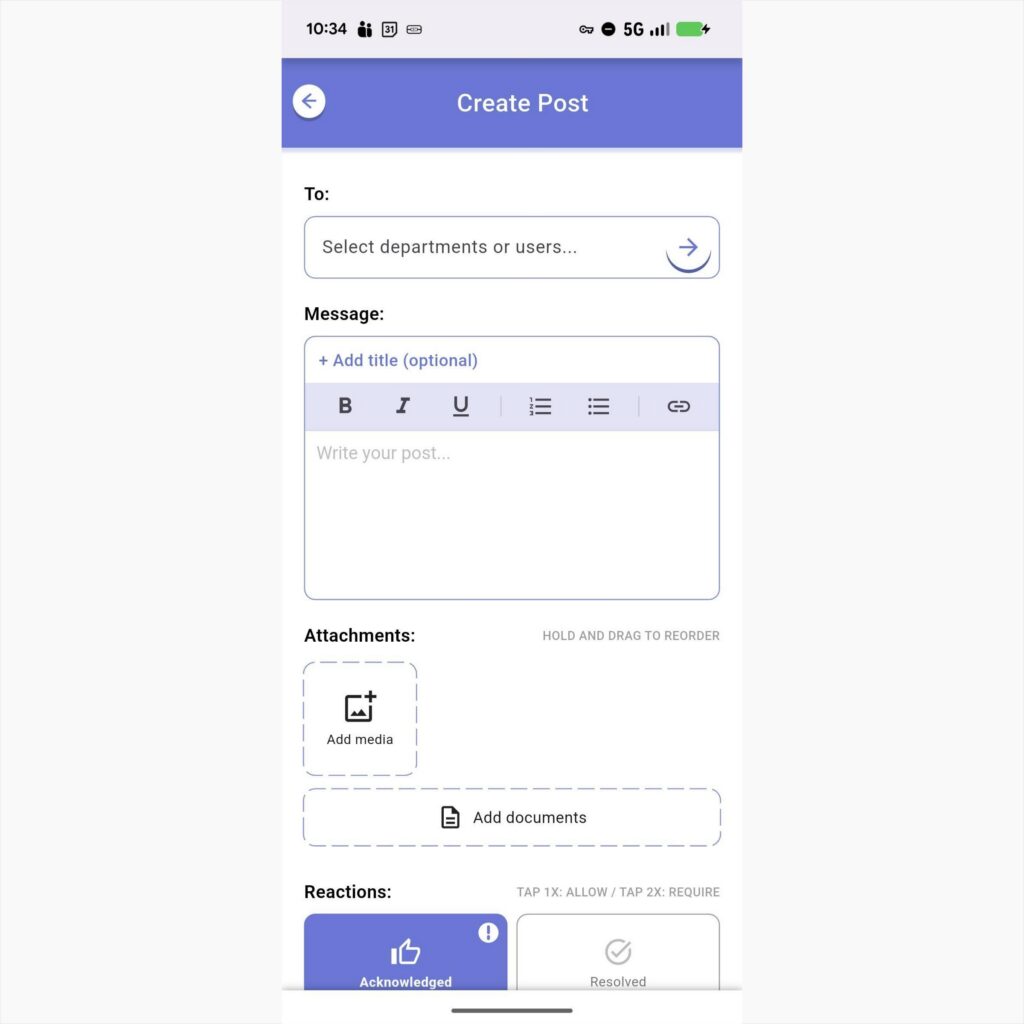
Step 1: Select Recipients #
The first section of the Create Post screen is the “To:” field. Tap the arrow button to open the recipient selection flow.
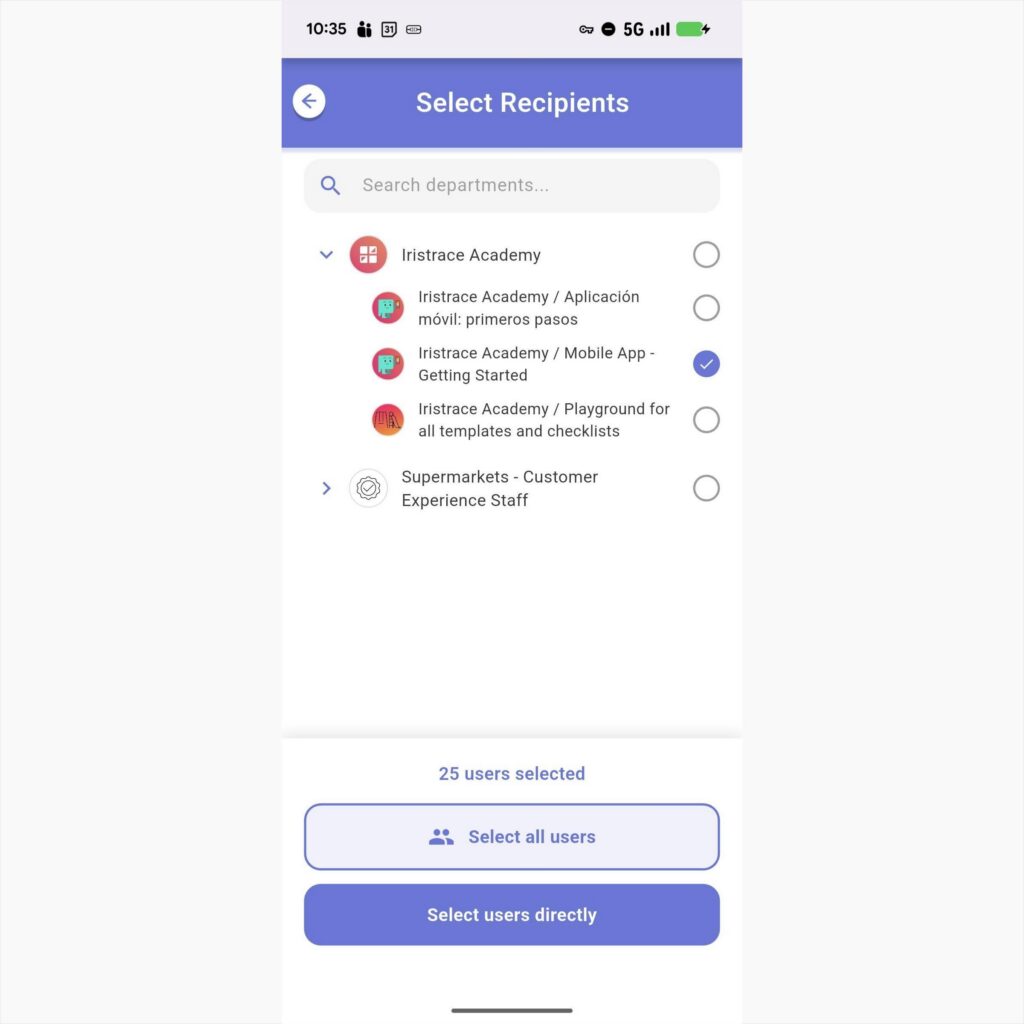
Building Your Recipient List #
The picker opens with a department list showing the departments you belong to. Selecting a department adds all users within that department to the recipient list.
- You can select multiple departments.
- Departments with subdepartments can be expanded using the arrow icon.
- Select all users — Adds every user across all of your departments.
- Select users directly — Skips department selection and lets you pick individual recipients.
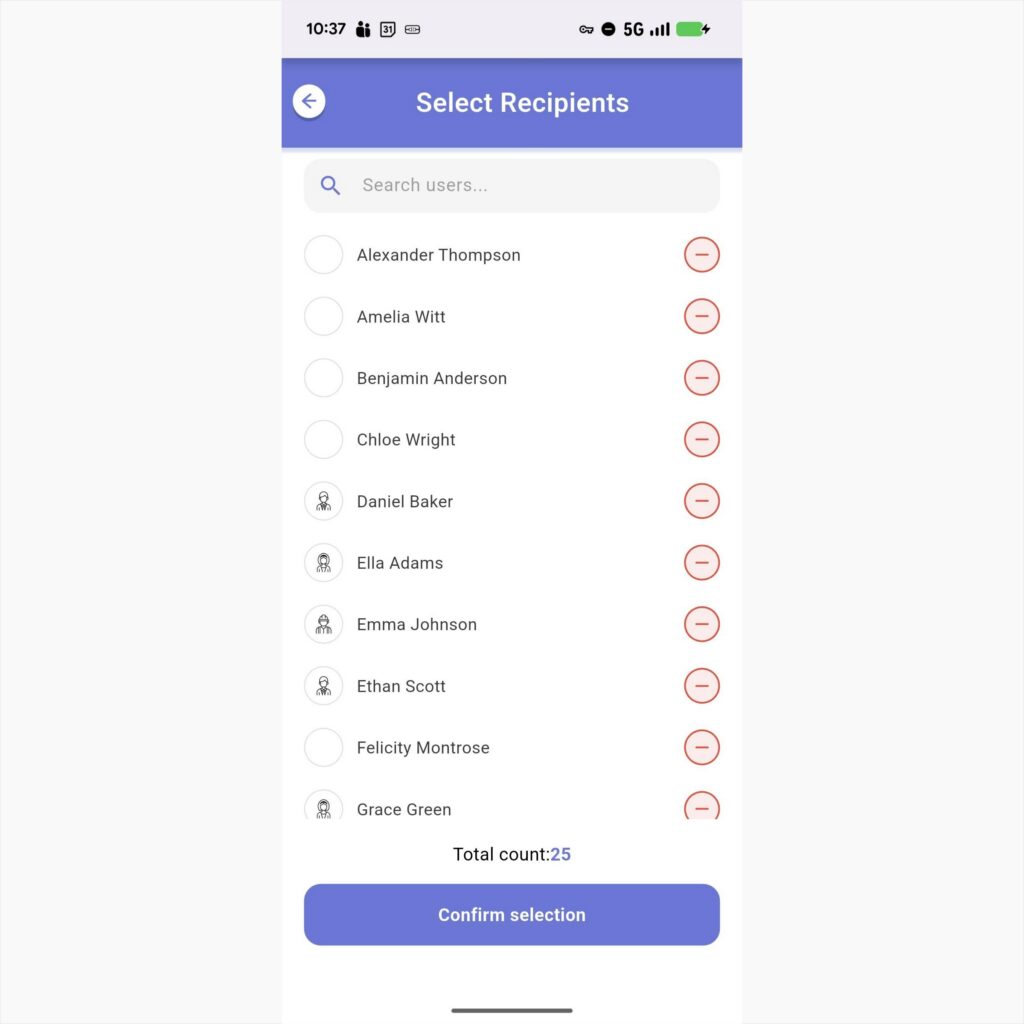
Reviewing and Confirming Recipients #
From the Select Recipients screen, you can:
- Search for specific users.
- Remove users by tapping the (-) button.
- Add individual users by tapping the (+) button.
- See the Total count of selected recipients at the bottom.
Tap Confirm selection to return to the Create Post screen.
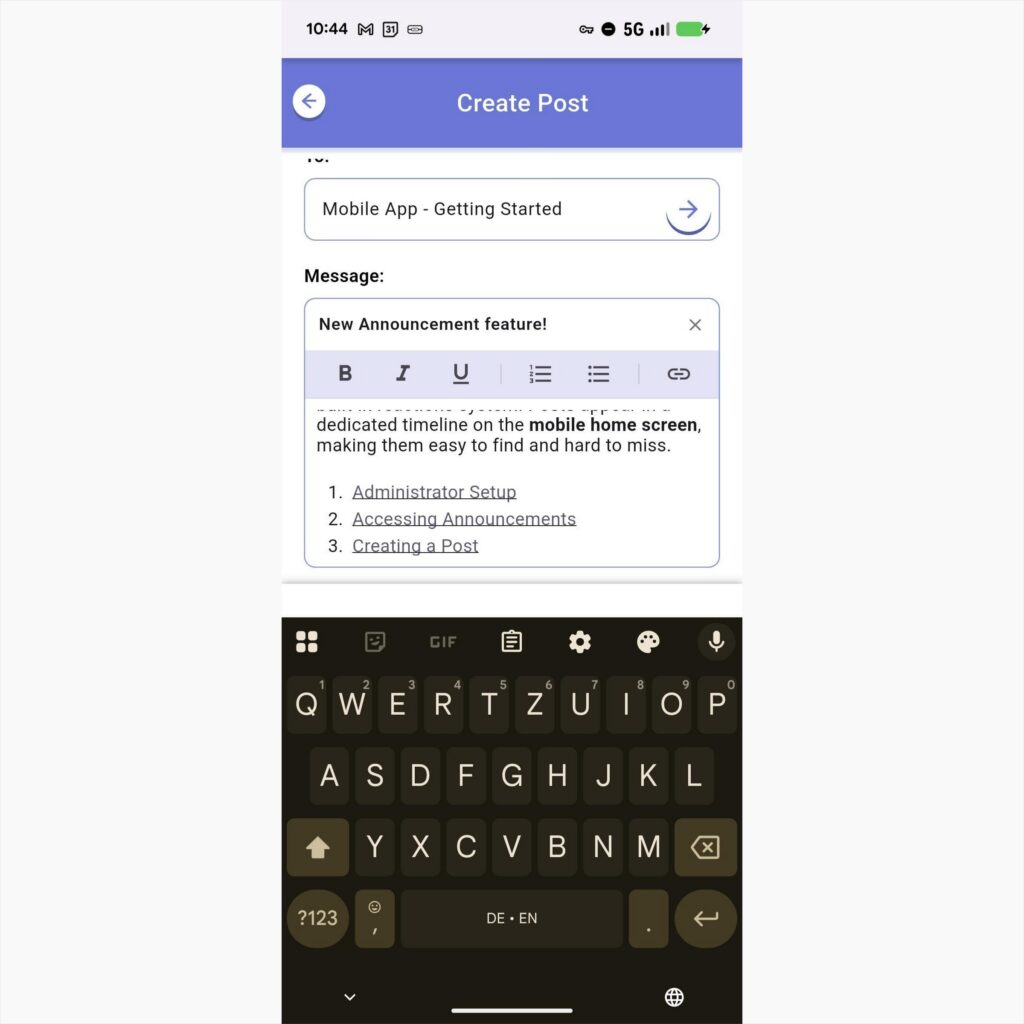
Step 2: Compose Your Message #
Title (optional) #
Tap Add title (optional) to add a bold headline to your post.
Message Body #
Write your message in the text editor. A rich text toolbar is available with:
- Bold, Italic, and Underline formatting
- Numbered and bulleted lists
- Hyperlinks
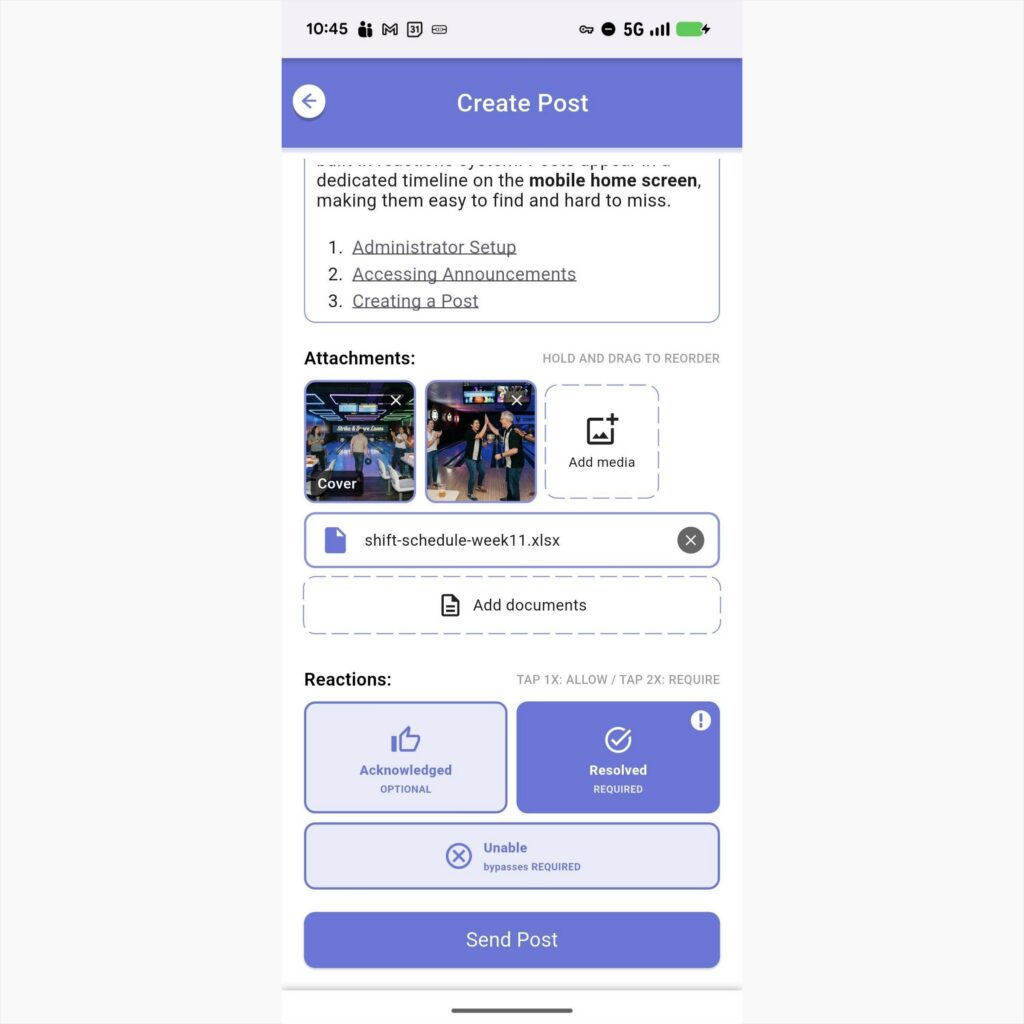
Step 3: Add Attachments #
Media (Images and Photos) #
Tap Add media to attach images.
- The first image is automatically used as the cover image.
- Hold and drag images to reorder them.
- A “Cover” badge is displayed on the first image.
Documents (Files) #
Tap Add documents to attach PDFs, spreadsheets, or Word documents for recipients to download.
Step 4: Configure Reactions #
Choose which reactions are available at the bottom of the Create Post screen:
- Acknowledged (Thumbs up)
- Resolved (Checkmark)
- Unable (Bypass option)
Setting Reaction Requirements #
- Tap once: Reaction is allowed (optional).
- Tap twice: Reaction is required (highlights the post for the user).
- Unable: This serves as a bypass for required reactions.
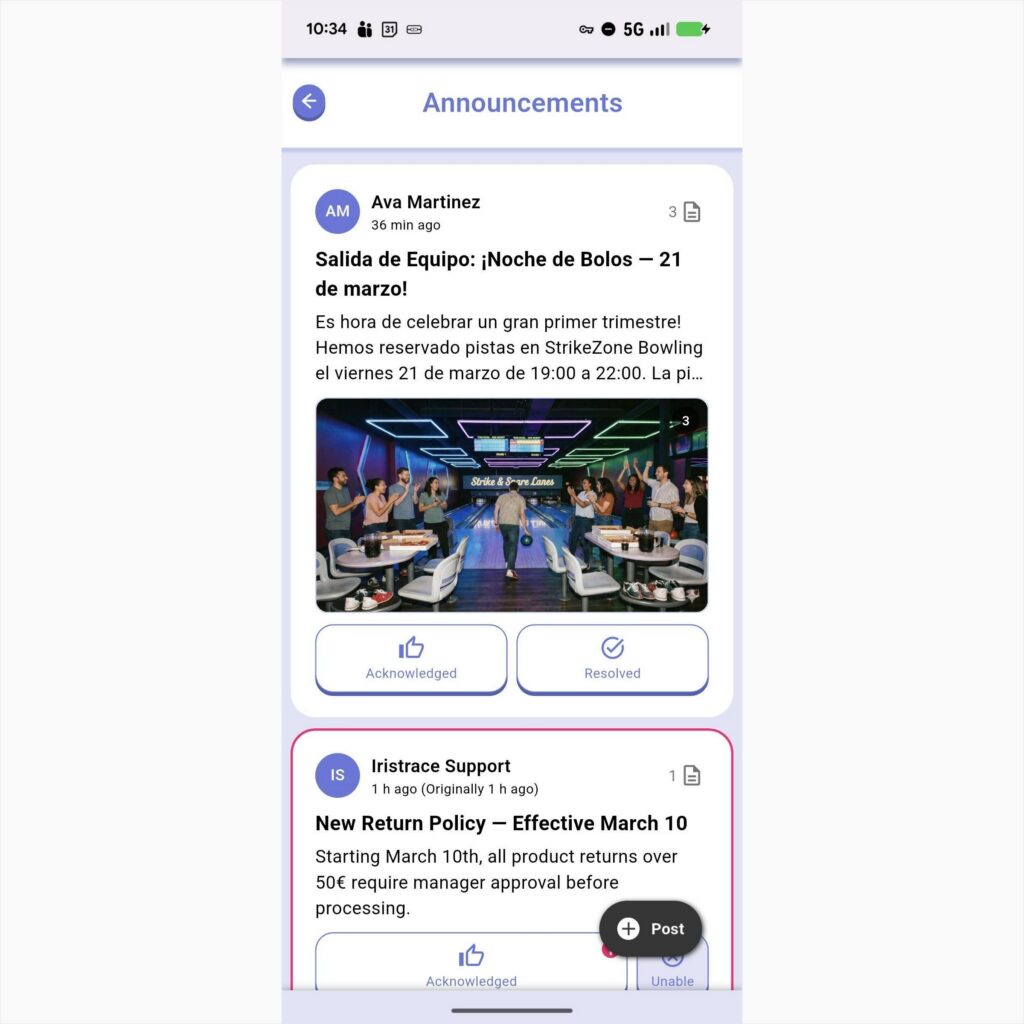
The Announcements Timeline #
Posts are displayed in reverse chronological order. Each card shows:
- Sender info and timestamp.
- Title and message preview.
- Cover image and attachment indicators.
- Direct reaction buttons.
Visual Indicators (Urgency) #
- Theme Color Border (e.g., Blue): Unfulfilled required reaction.
- Alert Color Border (e.g., Pink): A reminder has been sent for a required post.
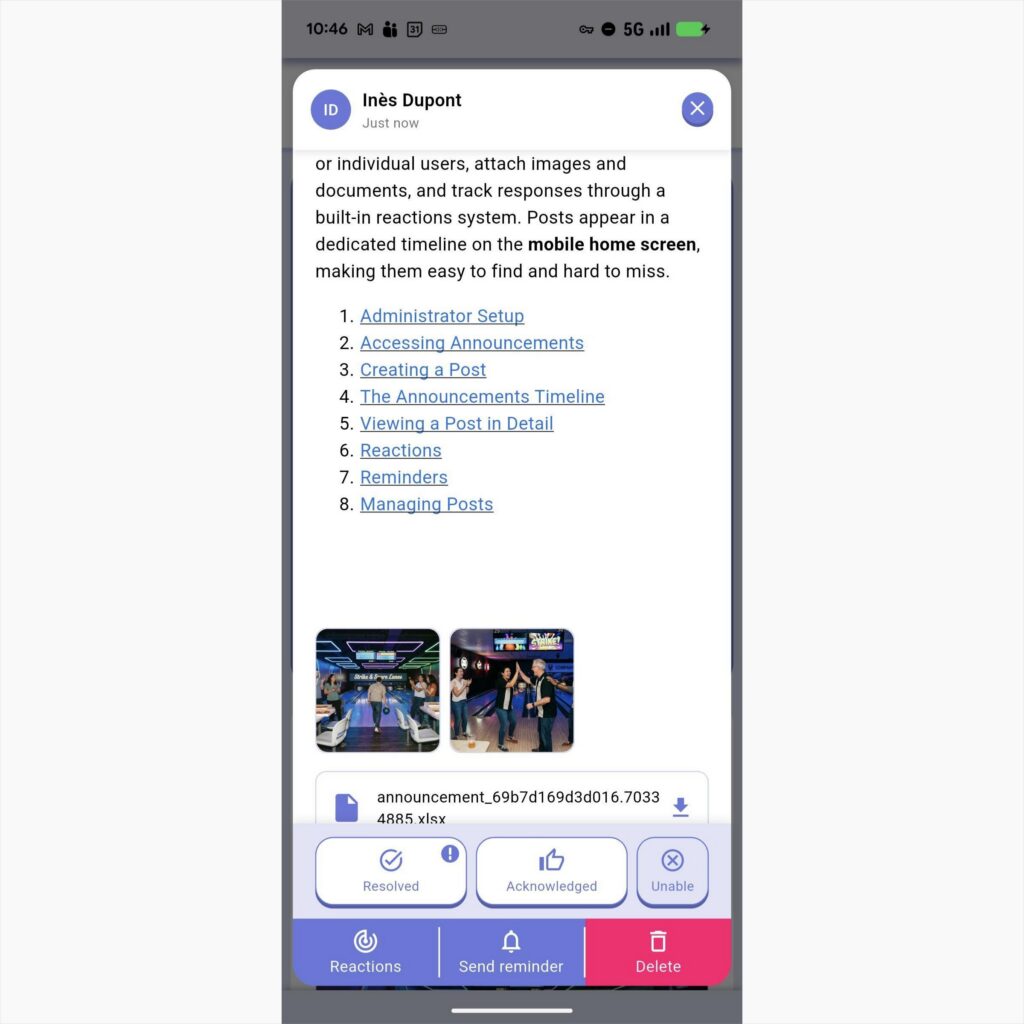
Viewing a Post in Detail #
Tap a post to see:
- Full message and gallery.
- Downloadable documents.
- Action bar (for creators/admins) to view Reactions, Send Reminder, or Delete.
Reminders #
Creators can nudge users who haven’t responded yet.
- Open the post.
- Tap Send reminder.
- The post moves to the top of the timeline for those users and changes to the alert color.
Quick Reference #
| Action | How |
| Access Announcements | Home screen > Announcements |
| Create a post | Timeline > + Post button |
| Target a department | To: field > Select departments > Confirm |
| Target specific users | To: field > Select users directly > Confirm |
| Add a cover image | Attach media > First image becomes cover |
| Reorder images | Hold and drag images in attachments area |
| Make a reaction required | Tap the reaction button twice |
| Respond to a post | Tap reaction button on card or in detail view |
| Bypass a requirement | Tap Unable (if available) |
| Send a reminder | Open post > Send reminder in actions bar |
| View who has reacted | Open post > Reactions in actions bar |